Recipe: Easy Weeknight Roast Chicken with Root Vegetables

IMG_3524

You know what pre-dated Pinterest fails? Recipe fails.

I’ve had my fair share of ’em, which is why I’m excited to share this practically-foolproof winter meal with roasted root vegetables.

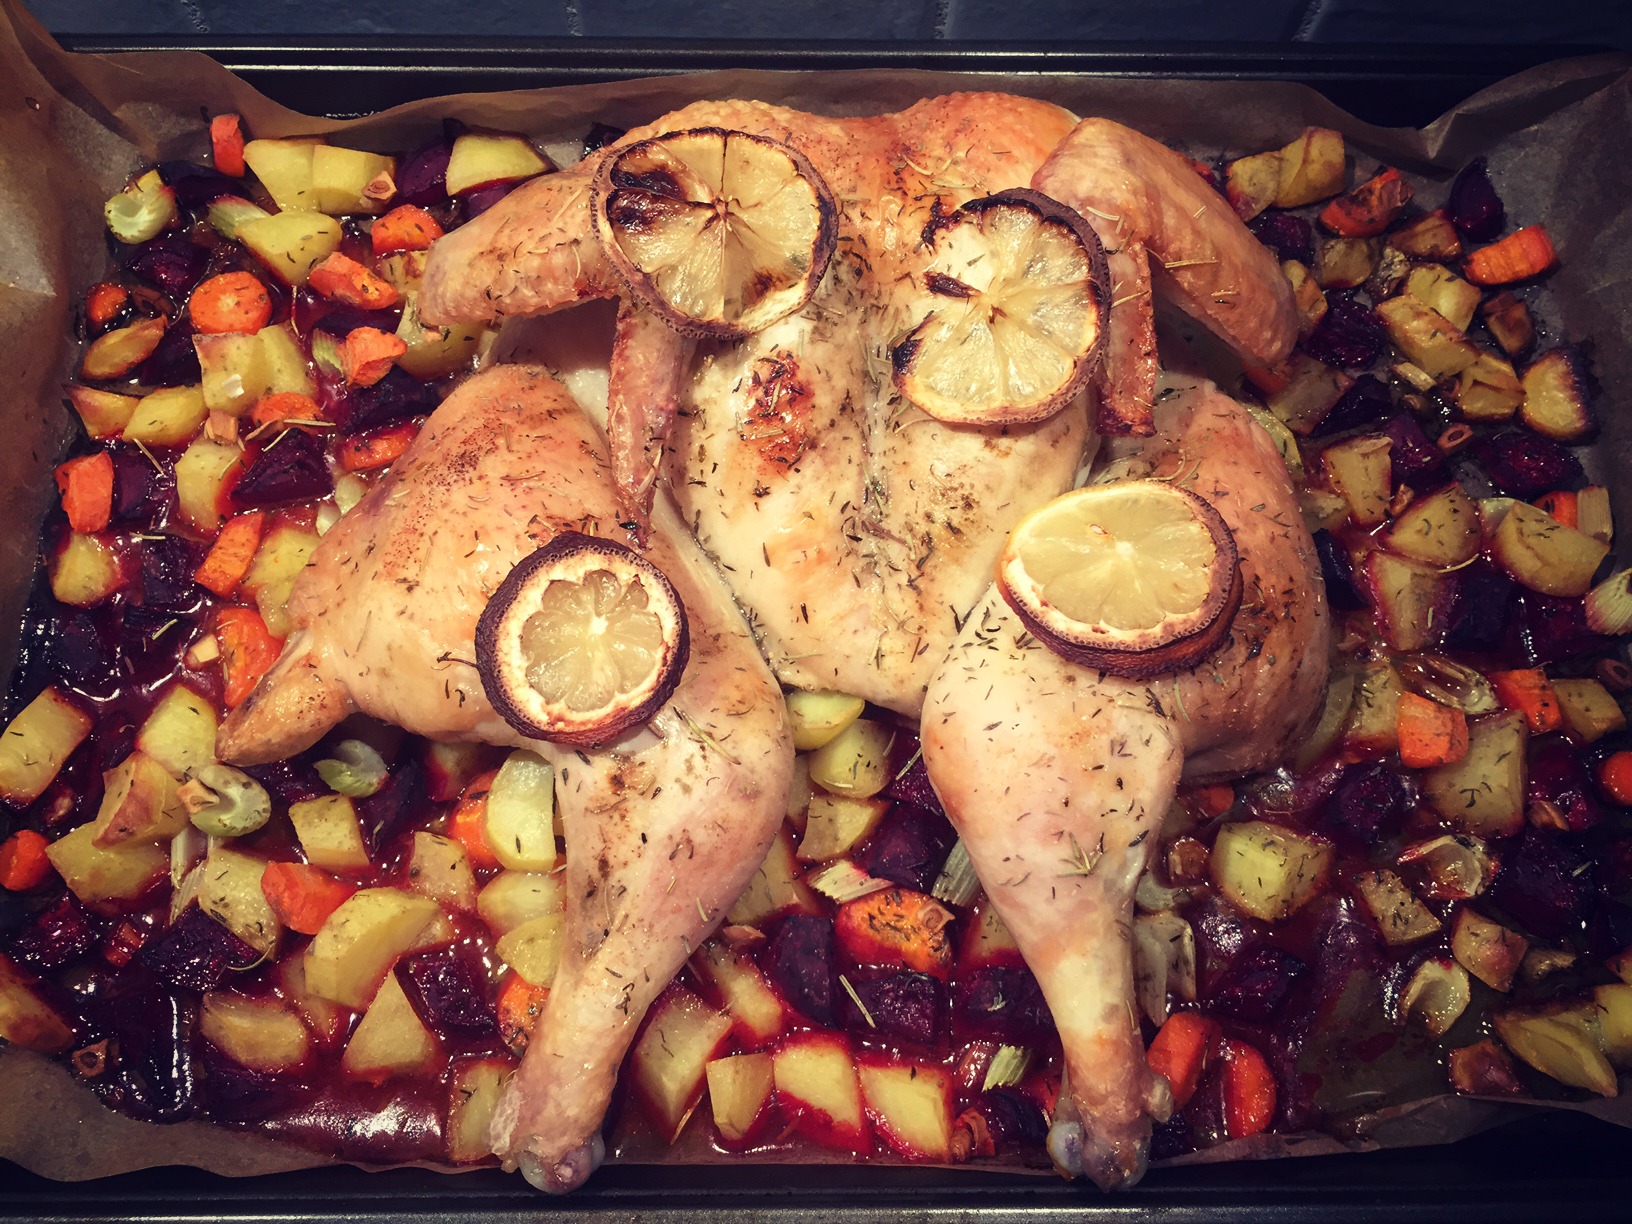
If you’re feeling timid about working with a whole chicken, just ask the butcher to butterfly it for you at the store. Believe me, there’s nothing quite like these veggies, which soak up all the yummy juices from the skin and flavor from the bones!

Easy Weeknight Roast Chicken with Root Vegetables

Ingredients:

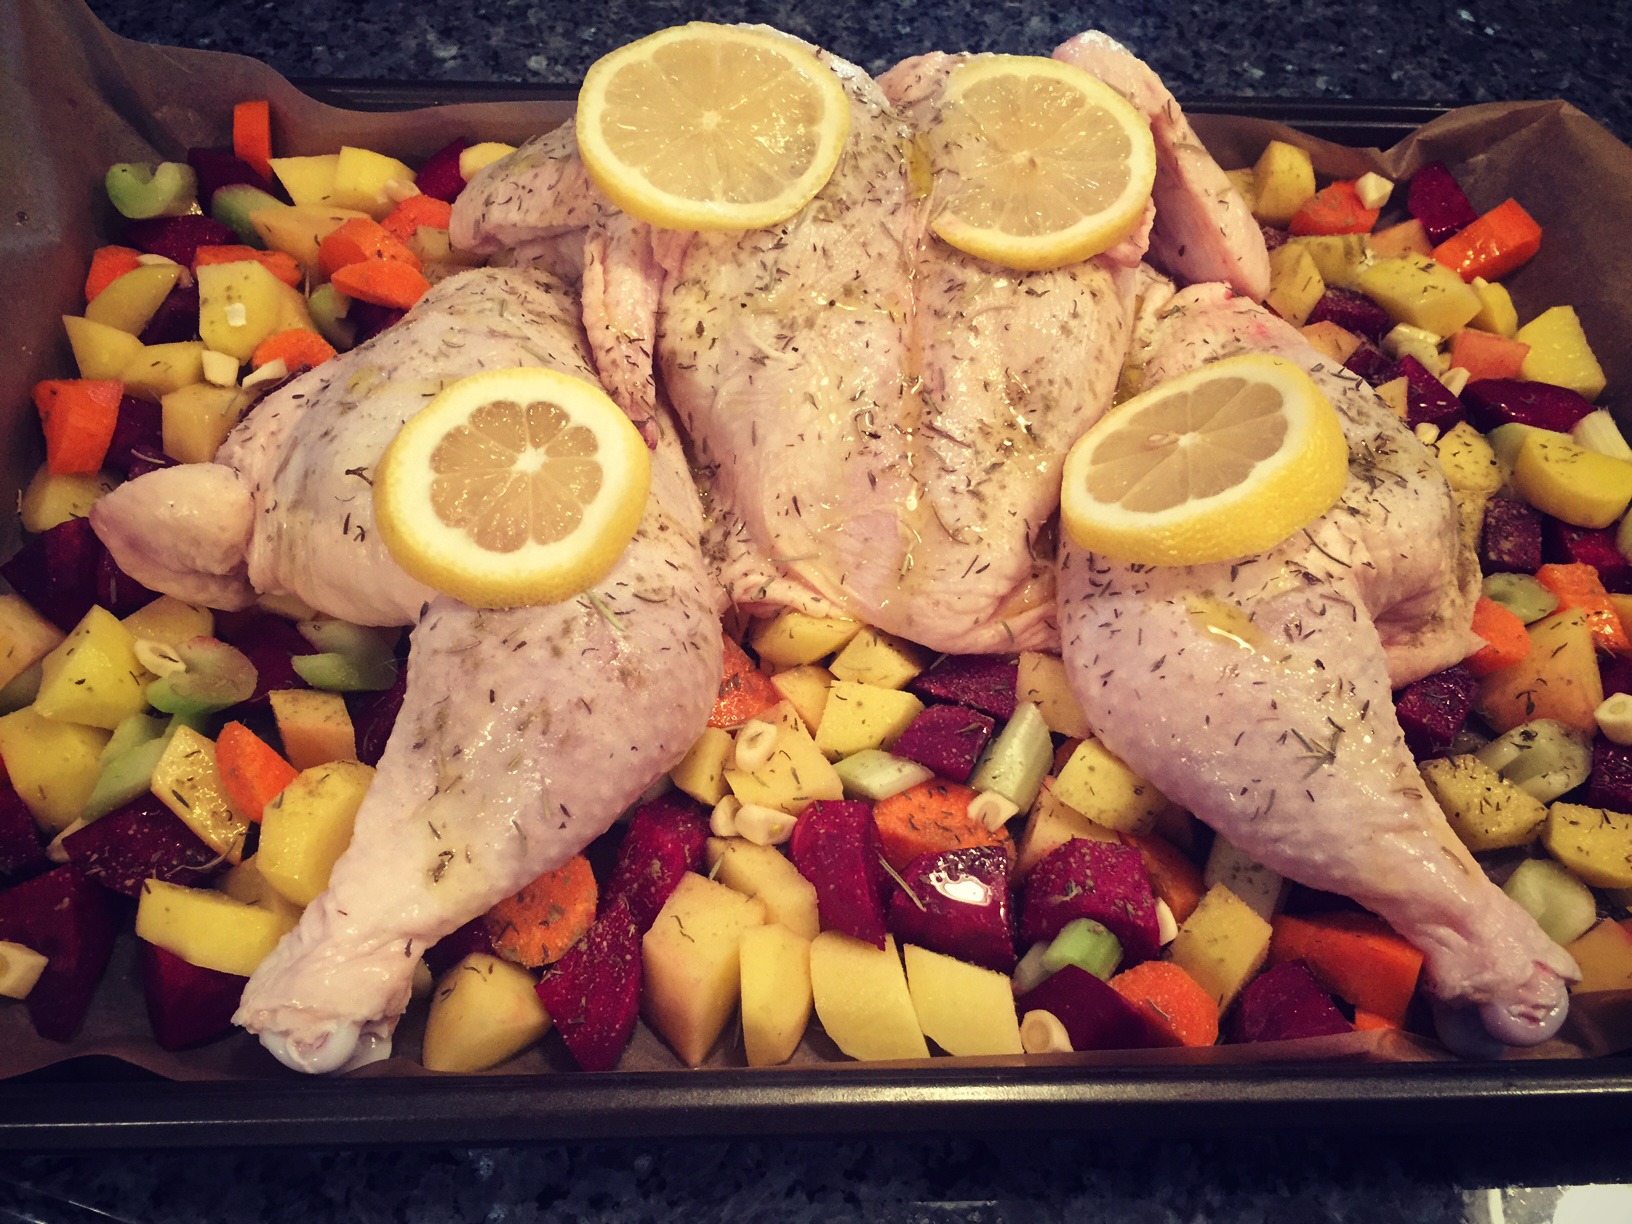
  • 3-4 lb. chicken, butterflied open
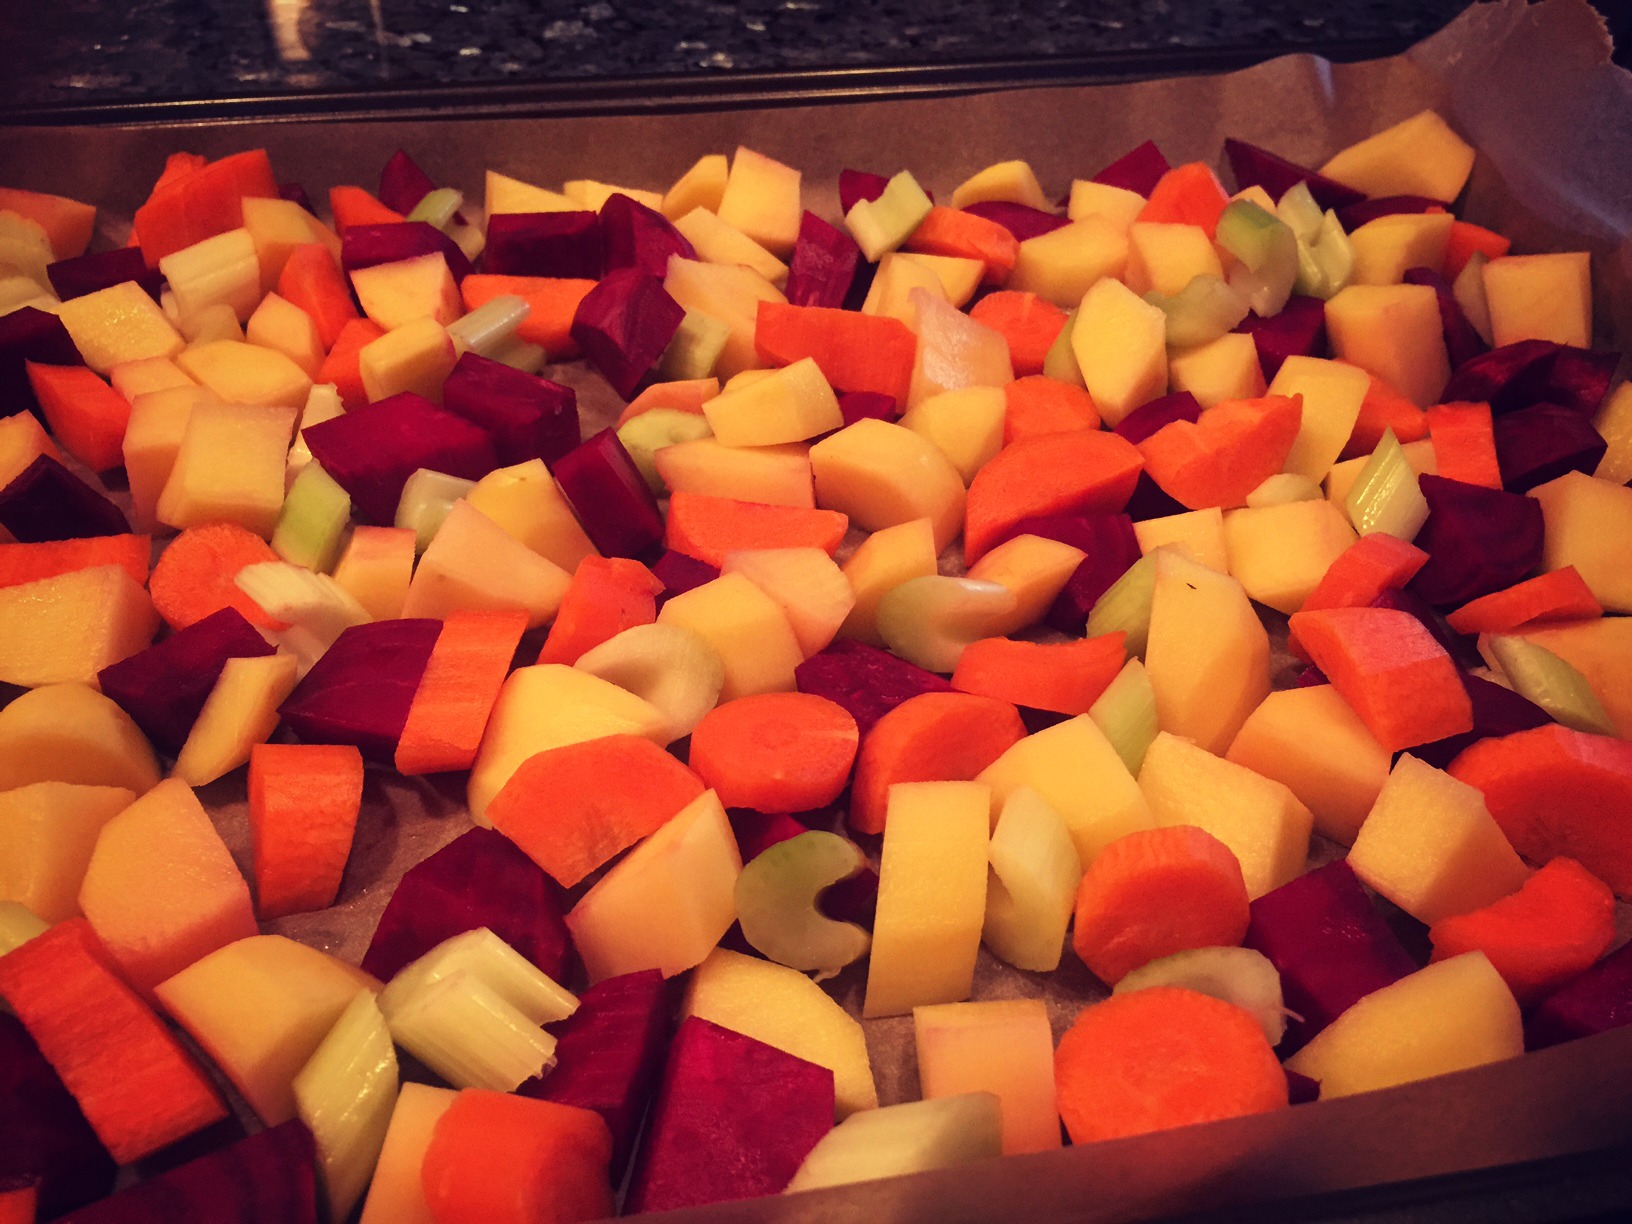
  • 5-6 small potatoes
  • 3-4 small beets
  • 2 carrots
  • 3 celery stalks
  • 1 medium onion
  • 5 garlic cloves
  • 1 Tbsp rosemary
  • 1 Tbsp thyme
  • 1 Tbsp sage
  • Olive oil
  • Salt and pepper
  • Lemon

Directions:

  1. Preheat oven to 350 degrees F, and line a rimmed baking sheet with parchment paper.
  2. Wash and/or peel and roughly chop potatoes, beets, carrots, celery, onion and garlic.
  3. Spread veggies out on baking sheet and drizzle with olive oil and half of the seasonings.
  4. Lay chicken on top of veggies, drizzling with more olive oil, and sprinkling on the other half of the seasonings. Slice lemon and place a few slices on top.
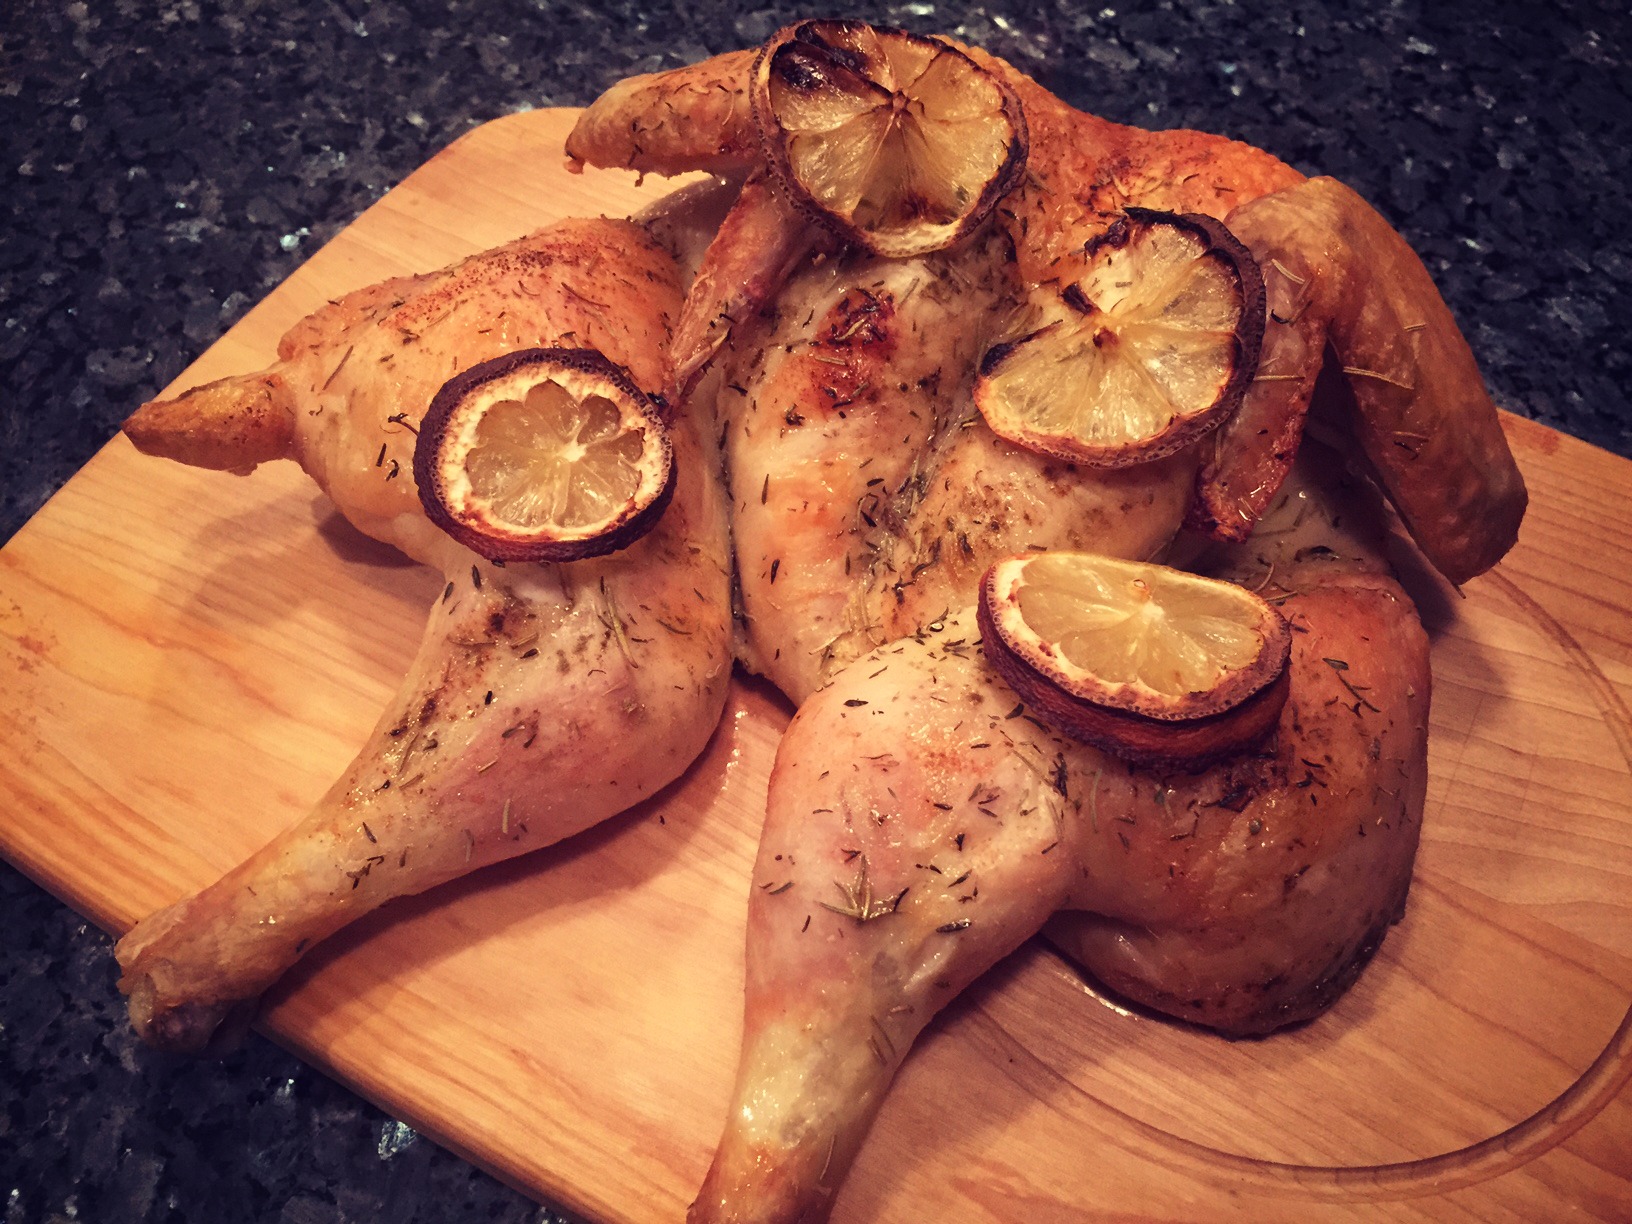
  5. Bake in oven for 50-60 minutes or until juices run clear and a meat thermometer inserted into the thickest part reads 165 degrees F.
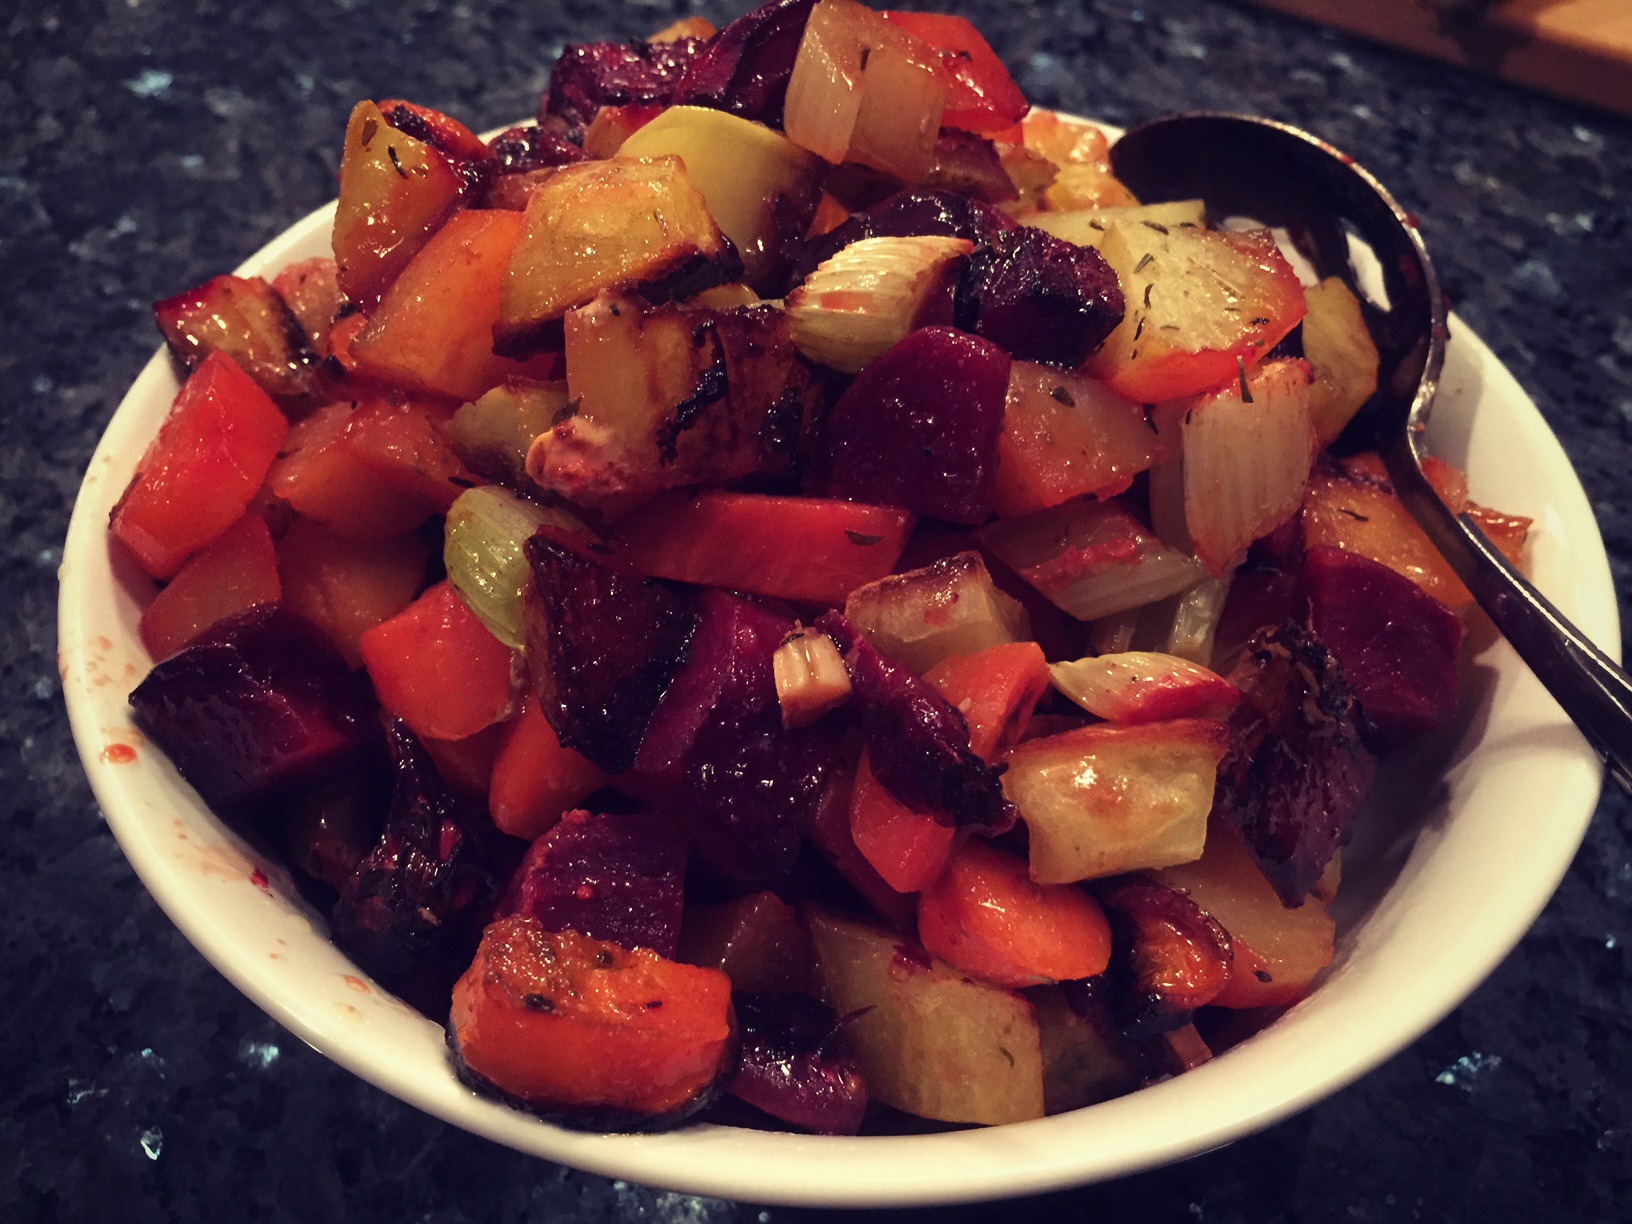
  6. Transfer chicken to a cutting board to rest for 10 minutes, and return the veggies to the oven to crisp up for 5-10 more minutes.
  7. Plate on a platter with veggies on the bottom, chicken on top, and garnish with a squeeze of roasted lemon.

Try not to overcrowd the vegetables in the pan; the more room you leave between them, the more they’ll cook evenly through.

IMG_3519

If you want an even juicier bird, rub it with the seasonings and an extra tablespoon of salt the night before, allowing it to soak everything up overnight in the refrigerator.

IMG_3520

You’ll know the veggies are done when they’ve got a nice caramelized glaze on them and you can pierce them easily with a fork.

IMG_3526

Even after the chicken skin browns up, you’ll want to check the underside to make sure it’s done; the first time I made this recipe, some of the thicker parts needed more time to cook through.

IMG_3527

Special occasion? Serve with a nice light red or creamy white wine, and enjoy!

Recipe: Banana Carrot Muffins

IMG_2573

I don’t know about you, but rainy weather and cold temperatures always put me in the mood for baking. That can get out of hand pretty quickly in a wet climate like Portland, though, so I’m making an effort to incorporate more nutrients into my sweet treats this season.

Case in point: I adapted the following recipe from Wassner Twins’ delicious Chocolate Chip Banana Bread, making some substitutions based on ingredients we happened to have on hand. The result is a perfect little pick-me-up for enjoying with your morning coffee — and it won’t leave you feeling sluggish for hours after.

Banana Carrot Muffins

Ingredients:

  • 3 bananas
  • 3 teaspoons cinnamon
  • 1/4 cup Agave syrup
  • 1/2 cup coconut oil
  • 2 eggs
  • 1/2 teaspoon vanilla
  • 3/4 cup all-purpose flour
  • 3/4 cup coconut flour
  • 1 1/2 teaspoons baking powder
  • 1 1/2 teaspoons baking soda
  • 1 tsp salt
  • 3 medium carrots, grated with a box grater (about 1 cup)

Directions:

  1. Preheat oven to 350 degrees.
  2. In a small mixing bowl, use a fork to mash bananas with cinnamon.
  3. Add Agave, oil, eggs and vanilla. Beat with a hand mixer on medium (or rigorously by hand) until combined.
  4. Stir in carrots until they’re evenly dispersed throughout the batter.
  5. Add flours, baking powder, baking soda and salt, mixing by hand until the dry ingredients are incorporated.
  6. Divide mixture into lined muffin pans, filling each one about three-quarters to full (batter won’t rise much).
  7. Bake 20-30 minutes or until edges are golden and a tooth pick inserted into the middle of each muffin comes out clean.

The Wassners recommend using bananas that aren’t over-ripe so the recipe doesn’t get too sweet, but you may want to adjust accordingly if you find that this recipe isn’t sweet enough to your taste.

IMG_2565

You can also play around with the amount of Agave to get the batter to your desired level of sweetness.

IMG_2566

And who would have thought to add carrot into banana bread?

But it’s a great way to get some good vitamin A, as well as a host of other powerful health benefits, including beautiful skin, cancer prevention and anti-aging properties.

IMG_2567

Another area in which you can experiment is the flours: If you’re gluten-free, feel free to swap out the all-purpose flour for your favorite alternative.

But I like to retain some of the white stuff to keep the muffins from getting too dense.

IMG_2568

One word of warning: The batter will be dry and thick, but don’t worry! Simply scoop it into your muffin cups instead of pouring it in.

IMG_2569

Because it is so thick, you’ll also want to smush it down in the cups to make sure they’re filled evenly.

IMG_2570

As you can see, they won’t rise much — if at all — so the best way to tell whether or not they’re done is to make sure to do the toothpick test.

Not only do oven temperatures vary, but these tend to take a bit longer to cook than traditional muffins, so don’t be surprised if their cooking time is on the higher end.

IMG_2574

I promise, though, they’re worth the wait. Your house will smell lovely, and you can eat as many as you’d like, guilt-free…well, within reason.

IMG_2576

What’s your go-to activity when the weather is crummy?

Recipe: Savory Paleo Cauliflower Rice

IMG_1595

While greens may be all the rage right now, there’s another member of the cruciferous family of vegetables you’ll want to add into your weekly meal rotation: Cauliflower.

Cancer-fighting, anti-inflammatory and antioxidant-rich, the versatile veggie provides your body with plenty of vitamin C, vitamin K and beta-carotene, plus it supports healthy digestion and detoxification.

After hearing a bunch of buzz about using mashed cauliflower in place of potatoes and grated cauliflower in place of rice, I decided to take the latter for a whirl. Not only was it a lot easier to make than I thought, but the texture and flavor were a hit with everyone — even the toughest meat-and-potatoes critics!

Savory Paleo Cauliflower Rice

Ingredients:

  • 1 head cauliflower, rinsed and patted dry
  • 1/2 yellow onion, finely chopped
  • 1 clove garlic, minced
  • 2 tbsp olive oil
  • 1/2 tsp Zehnder’s Chicken Seasoning (or similar flavoring, you may want to try chicken or beef bouillon)
  • Salt and pepper, to taste

Directions:

  1. Using a grater, grate the cauliflower to a coarse texture that resembles grains of rice
  2. Heat olive oil in a skillet over medium heat
  3. Add garlic and onion, and sauté until garlic just starts to brown and onion is translucent (3-4 minutes)
  4. Add in cauliflower and continue to sauté for another 4-5 minutes or until tender
  5. Season with chicken seasoning, salt and pepper, and serve

Here’s a closer shot to show the texture. Honestly, it’s pretty tough to tell that this isn’t the real thing (i.e. rice) — and the best part is that it’s super-filling, yet low in calories and packed with nutrients.

IMG_1594

And in case you’re wondering about the rest of the meal, I paired it with Almond Flour Chicken Fingers and broccoli for an all-around awesome Paleo-rific dinner. Enjoy!

Recipe: Easy Oven Ribs

IMG_1732

There’s just something about good BBQ that makes me downright giddy. Probably because I’ve developed an appreciation for how difficult it is to properly nail that beautifully subtle balance of tenderness, juiciness, smokiness, sweetness and mouthwatering tang.

Although this recipe won’t necessarily give the professionals a run for their money — full disclosure: it still needs some work in the smoke department — it does cover all the other categories quite nicely and will satisfy your mid-week rib craving just fine!

Easy Oven Ribs

Ingredients:

  • 4 lbs baby back ribs
  • 1 bottle of your favorite BBQ sauce
  • 1 oz apple juice/cider per package
  • 1 tablespoon cumin
  • 1 tablespoon paprika
  • 1 tablespoon powdered garlic
  • 1 tsp minced garlic
  • 1 tablespoon granulated onion
  • 1/2 tsp chili powder
  • 2 tablespoons brown sugar
  • 1 tablespoons kosher salt
  • 1/2 tsp cayenne pepper
  • 1/2 teaspoon black pepper

Directions: 

  1. Preheat oven to 225 F
  2. Divide ribs into smaller pieces so they can be arranged on a baking sheet, and place each section in a large piece of foil
  3. Mix together dry ingredients to make a rub, rub ribs with mixture and fold foil around ribs (leaving one end open to create a pouch)
  4. Pour 1 oz of apple juice/cider into each pouch, carefully folding the open end of the foil to create a closed pouch
  5. Repeat for each set of ribs, and wrap all in a second piece of foil so liquid won’t leak out while cooking
  6. Arrange rib packets on a baking sheet and cook for 1 hour per lb of ribs
  7. When they’re fork tender, open packets, swab with BBQ sauce and place under a broiler until BBQ sauce bubbles
  8. Remove from heat, and allow to cool slightly before serving

If you’re stumped on how to fold the foil packets, here’s a step-by-step tutorial from Bon Appetit that does a good job of breaking down the process.

IMG_1729

The shot above is post-broiler — ideally, you want to keep it under the heat until the BBQ sauce loses its “wet” look and appears more bubbly and caramelized. This is key to deepening the flavor and texture — i.e. getting you one step closer to finger lickin’ goodness.

IMG_1733

Pair with some steamed greens, baked beans and cornbread, and you’ve got one of my all-time favorite meals!

Recipe: Green Eggs & Ham Scramble

IMG_1686

Earlier this week, I wrote about the health benefits of eggs, so I wanted to follow it up with one of my favorite breakfasts. Not only is this recipe perfect when you’re short on time in the morning — just throw everything into the pan at once and stir to cook — but it’s also not super scientific, so feel free to tweak the ratios of ingredients and experiment with different meats, cheeses and other add-ins.

Green Eggs & Ham Scramble (serves 4)

Ingredients: 

  • 8 eggs
  • 4 slices ham-off-the-bone, diced
  • 4 slices cheese, diced
  • 2 leaves kale, finely minced
  • 1 tsp olive oil
  • Salt and pepper, to taste

Directions: 

  1. Prep your add-in ingredients first; wash, chop, then set aside.
  2. Crack the eggs into a pan that’s been heated with a little olive oil to coat the bottom.
  3. Add all the other ingredients, and stir until cooked to your desired consistency.

When I made this, I just happened to have deli chicken on hand, so I used that instead of the ham. And cheese-wise, I went with a Gouda, which lent a nice hint of smokiness to the dish.

IMG_1680

Wash, dry and finely mince the kale before tossing it into the pan with the other ingredients. That way it’ll cook down properly; the last think you want is to feel like you’re eating scrambled eggs mixed with a salad (ew).

IMG_1683

I happen to like my eggs on the drier side, too, so I cook everything longer — and this also gives the kale a chance to soften up. Make sure all the ingredients are incorporated evenly, and season to taste.

IMG_1684

Still not sure how you feel about eggs with kale? Well, in the words of our beloved Dr. Seuss:

You do not like them, so you say.
Try them! Try them! And you may.
Try them and you may, I say.

Happy, healthy eating! 🙂


Recipe: Paleo(ish) Pumpkin Bread

IMG_2001

Blogger pal LiteraryLydi requested a pumpkin bread recipe after seeing my recent post with Paleo-friendly banana bread. Ask, and you shall receive!

Since I was home in October for the marathon, I decided to tweak our family-favorite pumpkin bread recipe. It’s not completely Paleo since I wanted to retain more of the taste and texture of the original recipe, but it’s a step in a healthier direction that still got rave reviews.

Paleo(ish) Pumpkin Bread

Ingredients: 

  • 2 eggs
  • 1 can pureed pumpkin
  • 1/2 cup coconut oil
  • 1/4 cup water
  • 1 cup sugar
  • 1 tsp baking soda
  • 1 tsp baking powder
  • 1/2 tsp clove
  • 1/2 tsp cinnamon
  • 1 tsp salt
  • 1 cup coconut flour
  • 2/3 cup regular flour

Directions: 

  1. Preheat oven to 350. Grease or line a loaf pan with parchment paper.
  2. In a large bowl, mix all wet ingredients together. Add sugar, and stir.
  3. In a medium bowl, mix all remaining dry ingredients together.
  4. Slowly incorporate dry mixture into wet mixture in large bowl.
  5. Pour batter into loaf pan. Bake for ~60 minutes or until toothpick inserted into the center of loaf comes out clean.
  6. Remove from loaf pan and allow to cool before cutting.

Step one: Gather all your ingredients. As you can see, we were low on vegetable oil, so I just substituted coconut oil instead.

IMG_1993

Mix your wet and dry ingredients in separate bowls to make sure everything gets evenly combined.

IMG_1994

Don’t worry; the batter will be pretty thick. In fact, it had more of a cookie dough consistency at first, which is why I upped the original cup of pumpkin to the whole can.

IMG_1995

Because of the consistency of the batter, you may have to scoop (rather than pour) it into the pan. Smooth out the top with a spatula.

IMG_1997

Not sure if it’s done? First, the edges will brown. But make sure that toothpick comes out clean when you poke the center!

IMG_1998

Next time I’ll probably bake it a few more minutes because the center was just slightly under-done. But still delicious!

IMG_1999

What’s your family-favorite fall recipe? 

Recipe: Easy spaghetti squash side dish

Simply-Spaghetti-Squash-recipe

Lighter, brighter and packed with more nutrients than its pasta namesake, spaghetti squash is one of those veggies with which I have a love/hate relationship. I love eating it because it’s got a yummy nutty flavor and is low in calories and high in fiber. But, until now, I’ve had trouble preparing it to varying degrees of success in the microwave.

Not only is this oven method much simpler (with a quicker clean-up, thanks to the parchment paper), but baking it also imparts a rich, roasted flavor and helps the flesh from getting too soggy. And it’s the perfect side dish to lend a festive fall feeling to any meal.

Easy Spaghetti Squash Side Dish

Ingredients:

  • 2 spaghetti squash, halved and seeded
  • 4 Tbsp extra-virgin olive oil
  • 1 tsp onion powder
  • 1 tsp garlic powder
  • Sea salt and freshly-ground pepper, to taste
  • 2 Tbsp butter
  • 2 Tbsp Parmesan cheese
  • 1 Tbsp roughly-chopped parsley
  • 1/2 tsp red pepper flakes

Directions: 

  1. Preheat oven to 425 degrees.
  2. Drizzle squash flesh with olive oil, evenly dividing between the four halves.
  3. Season each of the four halves with 1/4 of the onion powder, garlic powder, salt and pepper.
  4. Place cut sides down on a parchment-lined rimmed baking sheet.
  5. Roast until squash is tender when pierced with a knife, about 1 hour.
  6. Remove from oven and allow to cool slightly before removing flesh strands with a fork.
  7. In a medium bowl, mix squash with butter, Parmesan, parsley and red pepper flakes. Serve immediately.

I always like to start by washing the outside of the squash. And cutting it in half can be a bit tricky, so be careful when wielding your knife.

IMG_1361

Clean out all of the seeds, but don’t worry about scraping the flesh clean.

IMG_1373

Arrange the squash halves so they all fit nicely on the parchment paper; this will keep you from having to do extra clean-up later!

The skins will darken slightly when cooked, and there may be some slight discolorations that come through, but that’s normal.

IMG_1382

When the squash is ready, you’ll be able to pull the strands away from the skin easily with a fork. Experiment with your favorite mix-ins, and enjoy.

IMG_1384

What’s your favorite seasonal twist on fall meals? 

Recipe: Thai-Style Pork Wraps

IMG_1224

Weeknight meals tend to be a slippery slope in our house: The best laid plans often devolve into snacking — or worse, dining out — unless we inoculate ourselves in advance with simple, quick recipes and easily-accessible ingredients.

This dish is just that — basically a one-pan meal that’s packed with protein and veggies, yet still full of decadent flavor. Make it early in the week, so you can re-purpose leftovers for lunches over rice or with noodles.

Thai-Style Pork Wraps 

(Recipe adapted from Better Homes & Gardens)

Ingredients: 

  • 1 can unsweetened coconut milk
  • 1/2 cup fresh cilantro, washed and chopped
  • 1/2 cup reduced sodium soy sauce
  • 2 limes, one juiced & one cut into slices
  • 2 Tbsp grated ginger
  • 1 Tbsp minced garlic
  • 1 Tbsp lemongrass paste
  • 1 tsp red curry paste
  • 1 lb boneless pork loin, cut into bite-sized pieces
  • 1 Tbsp coconut oil
  • 1 cup sliced fresh green beans
  • 2 cups shredded carrots
  • 1 head Napa cabbage
  • Extra cilantro for garnish

Directions: 

  1. In a large mixing bowl combine the coconut milk, cilantro, soy sauce, lime juice, ginger, garlic, lemongrass and curry paste. Add pork; toss to coat, and set aside.
  2. Heat coconut oil in a very large skillet over medium-high heat. Add meat mixture. Cook for 5 minutes. Add green beans. Cook and stir for another 5 minutes or until crisp-tender and until pork is just slightly pink, stirring occasionally. Add carrots just before serving.
  3. To serve, top cabbage leaves with pork mixture. Garnish with additional cilantro and serve with lime wedges.

Here’s a look at the process: First, wash & prepare all the vegetables (time-saving tip: I cut some corners on prep time and bought a bag of pre-shredded carrots).

IMG_1219

Instead of a skillet, we used our favorite wok from the famous Wok Shop in San Francisco’s Chinatown.

IMG_1223

Serve it up, making sure to garnish with a scoop of yummy sauce from the pan, and enjoy!

IMG_1225

How do you ensure your weeknight meals are healthy? 

Recipe: Paleo-friendly banana bread

photo 3 (1)

Eating healthy can be tough when one of your favorite fall activities is curling with a hot pumpkin-spiced latte while something yummy bakes in the oven. But after watching the eye-opening film Fed Up (if you haven’t seen it yet, it’s a must-watch), we’re making a concerted effort to cut down on sugar, forgo processed foods and make smarter tweaks to our favorite recipes.

Like this one I found for banana bread — it seems like we’ve always got a few over-ripe bananas that need to be used. They add natural sweetness, and using coconut flour in baked goods is an excellent lower-carb, high-fiber and gluten-free alternative to wheat flour.

The best part, though? Due to the higher fiber content, coconut flour doesn’t spike your blood sugar as quickly as grain-based flours — i.e. you won’t have that inevitable crash that comes post-sugar high. So you can have your cake…er, banana bread…and eat it (guilt-free), too!

Paleo-Friendly Banana Bread

(Recipe adapted from CivilizedCavemanCooking.com)

Ingredients: 

  • 4 bananas
  • 4 eggs
  • 1/2 cup peanut butter
  • 4 tbsp butter
  • 1/2 c coconut flour
  • 1 tsp pumpkin pie spice
  • 1 tsp baking powder
  • 1 tsp baking soda
  • 1 tsp vanilla
  • 1 tsp agave syrup
  • pinch sea salt

Directions: 

  1. Preheat oven to 350 degrees fahrenheit
  2. Combine bananas, eggs, nut butter and butter in a mixing bowl
  3. Once wet ingredients are blended, add in coconut flour, pumpkin pie spice, baking powder, baking soda, vanilla, agave syrup and sea salt and mix well
  4. Grease or line a 9×5 loaf pan with parchment paper before pouring in batter
  5. Bake for about 60 minutes or until a toothpick inserted into the center comes out clean
  6. Remove from oven and flip bread out onto a cooling rack
  7. Slice and serve!

This was my first time experimenting with coconut flour, and I’ve gotta say, I’m impressed. The texture and consistency seem similar to whole-wheat flour, which will make your baked goods slightly more dense.

photo 2 (1)

Not so dense, though, that you lose the cake-like quality of a good banana bread. And surprisingly enough, we didn’t even need butter; it was perfectly delicious and moist enough to munch on straight out of the oven!

photo 4 (1)

How do you feel about making over your favorite recipes with healthier ingredients? 

Recipe: Almond Flour Chicken Fingers

photo 5 (2)

My friend Katie is currently on the Whole 30 program, and as we were swapping healthy recipes the other night, she mentioned this one as a family favorite. While I’m not quite convinced I am able want to follow a strict eating regimen (you’ll have to pry carbs and dairy products out of my cold, dead hands!), I’m always game for anything that can get Hubby and I out of our weekly baked/grilled chicken rut. And this one just so happens to be pretty darn awesome.

Almond Flour Chicken Fingers

(recipe adapted from GenYFoodie)

Ingredients: 

  • 2 packages boneless, skinless chicken tenders
  • 2 cups almond meal
  • 1 tbsp paprika
  • 1 tsp cumin
  • 1 tsp cayenne pepper
  • 1/2 tsp black pepper
  • 1 tsp sea salt
  • 1/2 tsp garlic powder (we didn’t have, so I omitted)
  • 2 eggs

Directions: 

  1. Preheat oven to 375, and line a baking sheet with parchment paper.
  2. In a small bowl, lightly beat eggs, then set aside. In a shallow dish, mix together almond meal, paprika, cumin, cayenne, pepper, salt and garlic.
  3. Dredge each piece of chicken in egg, then roll in dry mixture to coat it completely. Repeat with each piece, arranging them all on baking sheet.
  4. Bake for 25-30 minutes or until golden.
  5. Serve with your favorite dipping sauce or chopped in a salad!

First prep the eggs in one dish, and measure out all the dry ingredients in another.

photo 1 (6)

Here’s what the coating looks like when it’s all mixed and ready for dipping.

photo 2 (5)

The almond flour helps create a wonderfully-thick breading, which will crisp up in the oven. These are all ready to go in for 25-30 minutes.

photo 3 (4)

And as an added bonus, the fat in the nut coating helps retain moisture for these little strips of goodness.

photo 4 (2)

One final tip: Make a double batch because they’ll disappear quickly!