Recipe: No Added Sugar Banana Zucchini Date (Smash!) Cake

IMG_7265

They say that with age comes wisdom. But, for me, it took being responsible for another little life to finally smarten up about my eating habits.

Sure, Ben and I have always tried to eat healthy, which mostly meant forgoing sugary treats until we’d eventually cave into temptation…only to start a cycle of guilt, restriction and inevitable relapse.

But it wasn’t until I got pregnant that I decided to cut myself some slack and relax when it came to cravings. Although with space in the belly at a premium, you’ve got to make every calorie count.

When I stopped thinking of foods as “good” and “bad” and started judging them on their nutrient density, I felt empowered instead of deprived. Not to mention it felt great to fuel my body — and my baby — with whole foods that would help both of us thrive.

Enter Bard Valley Natural Delights Medjool dates. I’ve partnered with them this year to help our family make the swap from refined sugars to a more natural alternative: whole foods that the body can recognize and pull nutrients from.

My 2015 almond milk experiment started what has become a passionate love affair with these little gems. Medjool dates deliver sustained energy from their combo of fiber and natural sugars, plus they’re packed with potassium to support muscle fuel and recovery.

So Wyatt’s first birthday “smash cake” became an experiment of sorts in substituting date paste for processed sugar. It may have taken me a few attempts — the first was too moist, the second was too dense — but the third time was a charm, as you can see from the shot below.

This recipe works for birthdays, but I think it’s even better made into muffins for a quick energy boost throughout the day. Finally, you can have your cake — and eat it (along with some very valuable nutrients), too.

No Added Sugar Banana Zucchini Date Cake

Ingredients: 

  • 2 small zucchinis, grated & squeezed dry (about 2 cups)
  • 1 ripe banana, mashed
  • 3 large eggs
  • 1/2 cup date paste
  • 1/2 cup natural peanut butter
  • 2 Tbsp vanilla
  • 1/2 cup coconut flour
  • 1 cup flour
  • 1.5 tsp baking soda
  • 1 tsp salt
  • 1 tsp pumpkin pie spice
  • 1 tsp cinnamon

Directions:

  1. Preheat oven to 325 degrees Fahrenheit and grease muffin cups with coconut oil (or use muffin liners).
  2. In large bowl, mix together zucchini and banana. Add eggs one at a time.
  3. Blend in date paste, peanut butter and vanilla.
  4. In small bowl, mix dry ingredients. Add slowly to wet ingredients, stirring to incorporate.
  5. Spoon into muffin cups, filling each 3/4 of the way.
  6. Bake for approximately 30 minutes, or until a toothpick inserted into muffin come out clean.

IMG_7204

Give it a try, and let me know what you think!

Recipe: DIY Chipotle Burrito Bowl

img_5050

When people talk about weird cravings during pregnancy, I often forget to mention what Ben likes to call the “Chipotle trimester.” Burritos were my jam, and I was a regular staple in the lunch line for several months…well, pre-E. coli-outbreak, that is.

Fast forward to having said baby and moving to the ‘burbs, though, and it’s a lot tougher to make regular pit stops into ‘potle these days. Plus there’s that whole wanting-to-eat-healthier thing and the there’s-barely-enough-time-to-eat-lunch-let-alone-make-it thing, which means meal planning and prep have become necessities for us.

Enter the following DIY recipe, which tastes almost as good as the real deal. Toss with greens for extra nutrients, fold into burrito form or scoop straight out of the bowl with chips!

DIY Chipotle Burrito Bowl

(adapted from What’s Gaby Cooking)

Ingredients:

For the Chicken

  • 1 tablespoon vegetable oil
  • 2 chipotle peppers in adobo, finely chopped
  • 1 teaspoon garlic powder
  • 1 teaspoon ground cumin
  • 1/2 teaspoon dried oregano
  • 1/2 teaspoon black pepper
  • 4 boneless, skinless chicken thighs (or 3 boneless, skinless chicken breasts)

For the Rice

  • 1 teaspoon vegetable oil
  • 1 cup brown rice
  • 2 cups water
  • 1 lime
  • 2 tablespoons freshly chopped cilantro
  • kosher salt to taste

For the toppings

  • 1 cup pinto beans (warmed)
  • 1 cup black beans (warmed)
  • 1 cup fresh corn, cut from the cob
  • 1 cup guacamole
  • 1 cup pico de gallo
  • 1 cup finely shredded monterey jack cheese

Directions:

For the Chicken

  1. Combine the vegetable oil, chopped chipotle peppers in adobo, garlic powder, cumin, dried oregano, and black pepper in a small bowl and stir to combine.
  2. Place the chicken in a large zip top plastic bag and add the marinade. Zip the bag and mix the chicken into the marinade. Place it into the fridge and let it marinate for at least an hour.
  3. Heat an outdoor grill to about 400 degrees F (medium high heat). Place the chicken onto the grill and grill 5 to 6 minutes per side, until the chicken is cooked. Remove the chicken from the grill and let rest for 10 minutes. Chop the chicken into small bite-sized pieces.

For the Rice

  1. In a heavy saucepan, heat the oil over medium heat. Once hot, add the brown rice and lime juice and sauté for 60 seconds to toast the rice.
  2. Add the water and bring the rice to a boil. Cover and reduce the heat to low and cook until the rice is tender and all the water is absorbed.
  3. Add in the cilantro and fluff rice with a fork.

To assemble

  1. Arrange equal parts of the brown rice and chopped grilled chicken in 4 bowls.
  2. Top with equal parts of the pinto beans, black beans, corn, guacamole, pico and cheese.
  3. Season with salt and pepper as needed and serve immediately.
To Chipotle or not to Chipotle…that is today’s question. Have you been back since the E. coli scare?

Fit Mom: Valerie Marshall on Finding the Balance in Motherhood

valmarshall5w

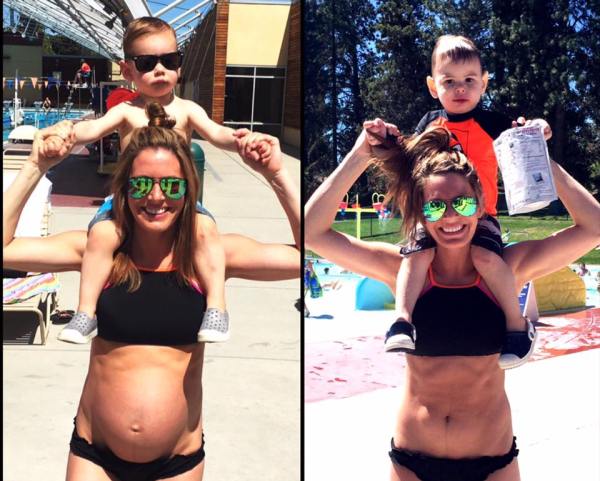
One week overdue with baby number two (left) & just five weeks postpartum (right)!

Most of the time I dedicate my Q&A’s here on the blog to athletes in pursuit of race goals, but this week I’m talking to a now-mom-of-two with some pretty awesome athletic achievements of her own.

I did a double-take when Valerie Marshall posted her pregnancy transformation shots (below) a few months back and was curious to chat with her more about her post-pregnancy journey.

While Val’s results may not necessarily be the norm (case in point: I’ve still got a few pounds to lose seven months out, but I’m in no hurry), they’re a testament to her hard work and dedication.

Yes, Val looks fabulous, but what I particularly love is that she embodies how pregnancy, childbirth and motherhood can be incorporated into a lifelong pursuit of health and fitness instead of approaching them as if you’ve reached the end of the road.

Read on for more of her philosophies, as well as Val’s top tip for new moms who are looking to reclaim their fitness and achieve “homeostasis” in their life…

Your transformation picture after your first pregnancy is impressive! What was your motivation for getting back into shape post-baby?

My motivation for getting into shape postpartum was easy and natural for me; I just wanted to exercise the way I did prior to pregnancy (and breastfeeding definitely helped). Before I was pregnant with Roman, my first pregnancy, I was training for my fourth marathon and I so badly wanted to get back to that place.

Did you do anything during your pregnancy that you think allowed you to bounce back more quickly after?

During my pregnancy I continued to exercise, but I modified high intensity workouts to medium or low intensity. As third trimester approached, I started to walk instead of run and do yoga or barre instead spin class. I believe that I bounced back so quickly postpartum due to exercising regularly before and during my whole pregnancy.

You attribute it to physical and nutritional work, but also a balance of wellness: social, emotional, spiritual, environmental, occupational, intellectual and physical – can you elaborate on what that means to you?

I attribute my overall well-being postpartum to the whole spectrum of wellness: social, emotional, spiritual, environmental, occupational, intellectual and physical.

Social: Within days postpartum I had my very first date as a mom with my husband, just the two of us. I had a difficult time leaving my newborn son, but I needed to remember that I am not only a mom, but a wife, too. About a week postpartum, I had my first girls’ night since being a mom. Once again, it was difficult to leave my newborn son, but I needed to remember that I am an individual as well as a momma. Plus, it was great bonding for my son to spend one-on-one time with his dad. From that first week on until now, I make sure to schedule out time for my husband, myself and friends and family; it’s all about balance in life.

Emotional: I was very emotional when I first became a momma, and throughout pregnancy; mainly due to hormones and lack of sleep, but also do to a changing lifestyle. To help keep myself in check, I went to yoga/meditated, exercised, and journaled.

Spiritual: Spiritually, I am a Christian and love to worship. So I made sure to set aside time for God, whether at church, in the car, or at home (usually while breastfeeding).

Environmental: This does not directly relate to how I bounced back postpartum, but I do try to use all organic products and organic/minimally processed foods. I enjoy the great outdoors and breathing in fresh air (I love living in Bend where recreational fitness is all around).

Occupational/Intellectual: Prior to being a momma I was a working-woman with a degree in Fitness and Nutrition. I made it a point to keep up on educating myself, so that one day when I do enter the workforce I will not be lost in the dark. I also really love learning about wellness and educating not only myself, but friends and family, as well.

valmarshalltransformationtues

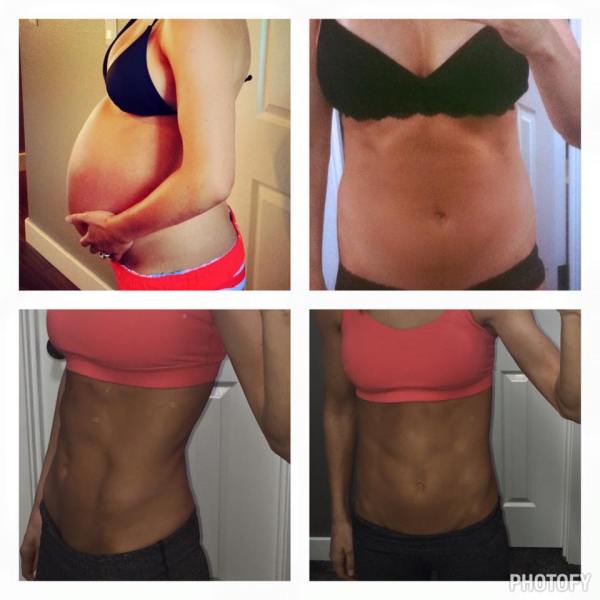
Val gained 40lbs while pregnant with her first baby (upper left), then had 10 lbs and muscle left to gain one day postpartum (upper right). She credits a “proper balance of wellness” to her results nine mos later (bottom)!

Walk us through some highlights of typical days of exercise & nutrition – immediately after, then 3, 6, 9 and 12 months out from being pregnant.

Highlights of typical days of exercise and nutrition: We all love to have our cake and eat it, too. I am a huge believer in rewarding yourself whether that be with food or not, but for me, I definitely reward myself with desserts. Plus, breastfeeding made me extremely hungry all of the time. I try to eat a “balanced” diet most days of the week to maintain a healthy lifestyle now and for a healthy future.

Nutrition is not only for weight, but is also for prevention and treatment of many diseases, so I try to keep that in mind when I am planning my meals. Meal planning was extremely important for my nutritional habits postpartum. It is so easy just to snack and graze throughout the day or to go long periods of time without eating. I would meal prep and prepare meals usually on Sundays or even just the night before. This definitely takes time out of your already busy and tiring day, but it is so worth it. I could talk days and days about nutrition, it is a true science to find what works for your body and lifestyle.

0-3 months: Due to nap schedules and lack of sleep, I exercised whenever I could find time. During those first three months I spent a lot of time walking, running and doing Barre3. At the local gym, there is a Baby and Mommy cycle class, where I could bring Roman in with me. This class was awesome, I was able to do an hour cycle class and he either napped in the stroller right in front of me or he played on a blanket on the floor.

3-9 months: I was not quite ready to introduce Roman into gym daycares yet, so I continued to exercise at home or when my husband, mom or best friend could watch him. During these months I ran, went to Baby and Mommy cycle class, started cardio yoga and did p90x.

9-12 months: I was finally ready to introduce Roman to gym daycares, which he loves going to. Roman started walking at 9 months, so he was on the move, which made it difficult to exercise at home. At the gym, I participated in HIIT classes, cycle classes, cardio yoga and some light lifting in the weight room.

And baby no. 2 (the adorable Kennadi) is a girl – congratulations! How was your second pregnancy? What’s the same & what’s different this time around?

Pregnancy #2: I was so excited and much more relaxed with this pregnancy. I had a lot of energy, thank goodness, since I was chasing after a toddler all of the time. I exercised and did my prenatal stretches most days of the week to prepare for the arrival of baby girl. I had a much more difficult time eating “healthy,” however; all I want to do is eat cookies and bagels with cream cheese!

My plan was to just play-it-by-ear for the first month or so when it comes to setting any fitness goals. Basic fitness goals of mine, with no set timeline as of now, would be to run a few more full marathons and maybe even my first sprint triathlon. Physically, I would love to get my body back to where it has been in the past, but I have a feeling that will take more time this round than it did when I was just a mother of one.

What’s your top tip for new moms who are looking to reclaim their fitness and achieve “homeostasis” in their life, as you call it?

My top tip is to set goals, make a schedule, have a plan and stick with it. Most importantly, remember that you are an amazing mother, but you are not only a mother; you have so many more roles in life and they should all be given special attention.

baggsfam

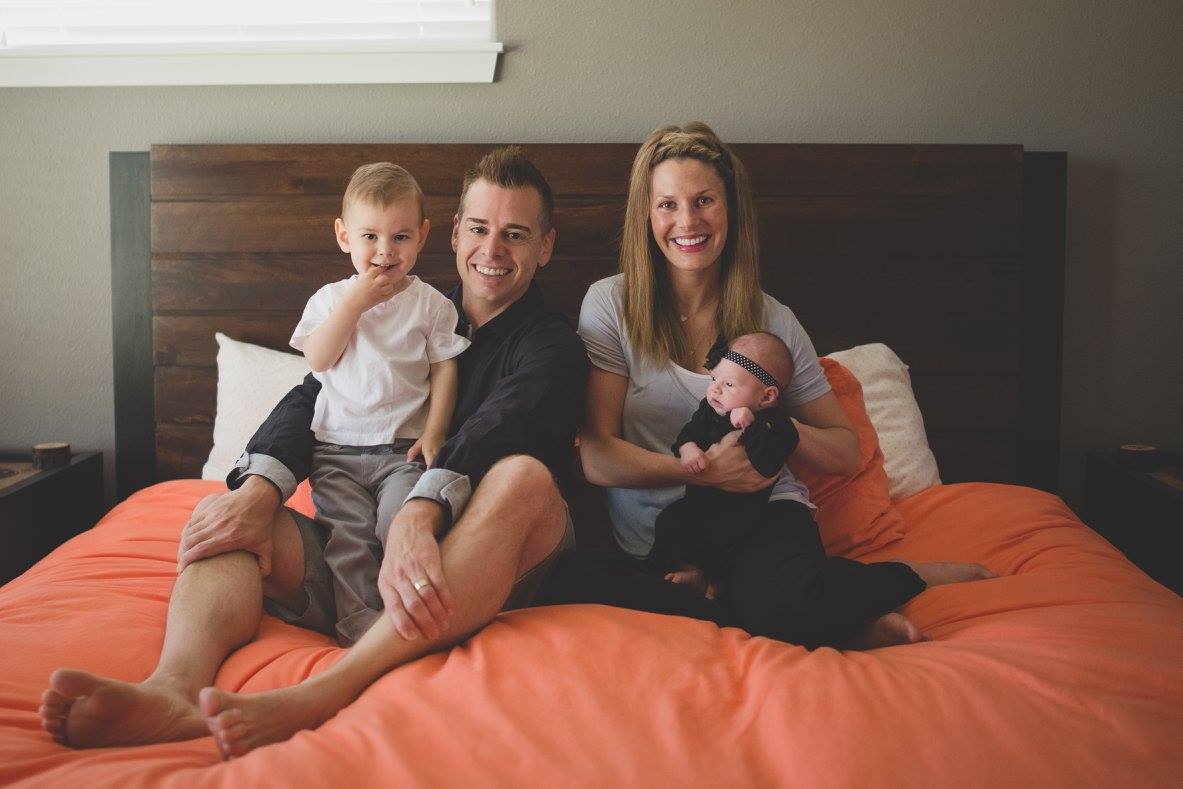
The Baggs family: Roman, Tim, Val & Kennadi

Thanks for your time, Val — and congratulations again on your beautiful new addition!

Fit mamas, I’d love to interview you! Email me at info (at) kineticfix (dot) com for info. 

Recipe: Lemon Raspberry Greek Yogurt Muffins

lemraspgrkyogmuff

When life hands you lemons…MAKE MUFFINS!

It’s good to have a go-to recipe in your back pocket, whether someone stops by unexpectedly, you want to take a crowd-pleaser to an event or you’re looking for something special — yet simple — on a weekend morning.

Mine just happens to be lemon blueberry muffins; not only do I always seem to have the ingredients on hand, but they’ve never earned less than rave reviews (seriously, yogurt is the secret to tangy, moist, yummy muffins).

No blueberries? No problem. I experimented recently with a raspberry version that’s just as lovely — plus it’s lower in sugar and includes some extra nutrients and fiber thanks to the addition of wheat flour.

Lemon Raspberry Greek Yogurt Muffins

(recipe adapted from Running with Spoons)

Ingredients: 

  • 1 cup all-purpose flour
  • 1/2 cup whole wheat flour
  • 1 tsp. baking powder
  • 1/2 tsp. salt
  • 1/2 cup plain Greek yogurt
  • 2/3 cup sugar
  • 1/4 cup vegetable oil
  • 2 Tbsp. honey
  • 1 tsp. vanilla extract
  • 2 large eggs
  • 2 Tbsp. juice from 1 medium lemon
  • zest of 1 medium lemon
  • 1 cup fresh or frozen raspberries

Directions:

  1. Preheat oven to 350F and prepare a muffin pan by spraying cavities with cooking spray or greasing them with oil. Set aside.
  2. In a medium-sized mixing bowl, combine flour, baking powder, and salt. Set aside.
  3. In a separate large mixing bowl, combine Greek yogurt and sugar, mixing until the sugar dissolves and the mixture becomes smooth. Add oil, honey, vanilla extract, lemon juice, and lemon zest, mixing until well incorporated. Add eggs, one at a time, beating well after each addition.
  4. Gradually add flour mixture to yogurt mixture, mixing gently until just combined. Fold in berries.
  5. Divide batter evenly among the 12 muffin cups, filling about 3/4 of the way full. Batter will be on the thicker side, so use a spoon to scoop it in. Sprinkle with additional berries, if desired.
  6. Bake muffins for 20-22 minutes, or until top is firm to the touch and toothpick inserted into the center comes out clean. Allow muffins to cool in pan for ~10 minutes before transferring to a wire rack to cool completely.
Got any go-to recipes that you’ve relied on over the years?

Recipe: Best-Ever Chocolate Chunk Cookies

IMG_1808

If you’re looking for one of the most delicious, nutrient-dense treats out there, this recipe just may be the Holy Grail of chocolate chip cookies.

Full disclosure, though: They’re actually “lactation cookies” meant for increasing a nursing mom’s milk supply. But dads and everyone else, don’t worry — they will not spontaneously produce lactation!

Even if you’re not breastfeeding, these cookies deliver important nutrients that all of us need, such as zinc, fiber, good fats, iron, protein, B vitamins, chromium, selenium and various other trace minerals.

Not to mention, they’re absolutely delicious…

Best-Ever Chocolate Chunk Cookies

(adapted from HowSweetItIs.com)

Ingredients: 

  • 1 1/2 cups old-fashioned rolled oats
  • 1 1/2 cups steel-cut oats
  • 1 cup unbleached organic all-purpose flour
  • 1/2 cut whole-wheat flour
  • 5 tablespoons brewers yeast
  • 3 tablespoons ground flaxseed
  • 1 tablespoon wheat germ
  • 1/2 ounce unsweetened coconut chips/flakes
  • 1/2 teaspoon baking powder
  • 1/2 teaspoon baking soda
  • 1/2 teaspoon ground cinnamon
  • 1/2 teaspoon salt
  • 12 tablespoons organic unsalted butter
  • 4 tablespoons unrefined organic virgin coconut oil
  • 1 1/4 cups organic cane sugar
  • 1 large egg + 1 large egg yolk
  • 2 teaspoons vanilla extract
  • 1 1/2 cups dark chocolate chips/chunks (I chopped up a few king size Hershey’s bars we had lying around, just to use them up)

Directions: 

  1. Preheat the oven the 350° F.
  2. In a large bowl, whisk together both kinds of oats, flours, yeast, flaxseed, wheat germ, coconut, baking powder, baking soda, cinnamon and salt.
  3. In the bowl of your electric mixer (or with a hand mixer), beat the butter and coconut oil on medium speed until creamy. Add in the sugar and beat on medium to high speed until fluffy, scraping down the sides of the bowl if needed. Add in the egg and egg yolk, beating until combined. Add in the vanilla extract and beat until combined again. Gradually add in the dry ingredients, beating on low speed until just combined. Stir in the chocolate chips with a spatula until they are evenly dispersed.
  4. Form the dough into 1-inch rounds and place on a baking sheet about 2 inches apart. Bake for 15-18 minutes, or until the bottoms are just golden. Let cool completely before storing in a sealed container.
If you have a great lactation recipe, please feel free to share below! 

Recipe: “Angeled” Eggs

IMG_1632

What’s not to love about eggs?!

They’re cheap, easy to make and super versatile — not to mention full of protein, fats and 12+ vitamins and minerals — which is why they’re a staple in our house, particularly these past few months during ’round-the-clock eating and bun-in-the-oven baking.

Ben’s favorite way to consume them is something he calls the “poor man’s deviled egg,” a recipe he created in college. Ready for it? You grab a hard-boiled egg, and squirt yellow mustard on it in between bites, usually while standing over the kitchen sink.

While I can’t knock his, uh, creativity…stomach space is at a premium these days, so I need something that packs a bit more of a punch in the nutrient density department.

Enter “Angeled” Eggs. By replacing the usual mayo with a healthy zing of hummus, you’ll not only save a few calories but also add extra protein, iron and fiber into one incredible little snack.

“Angeled” Eggs

(adapted from PopSugar’s recipe here)

Ingredients: 

  • 1 dozen hard-boiled eggs
  • 1 16-ounce container hummus
  • Smoked paprika

Directions: 

  1. Remove shells from hard-boiled eggs while rinsing under cool water to help separate.
  2. Cut eggs in half lengthwise, carefully scoop out yolks and place them in a bowl.
  3. Mash yolks with a fork. Add hummus, and mix together until creamy.
  4. Spoon the egg mixture into the egg-white halves. Top with a pinch of smoked paprika, and serve immediately.
Got any quick, easy & healthy egg recipes to share? I’m always on the lookout!

15 Healthy Snacks for the Pregnancy Homestretch

SmartSnacks

Combine shrinking stomach space and a temperamental tummy with the mounting nutritional needs of growing a baby, and you’ve got a potential recipe for pregnancy disaster.

Case in point: When an earlier ultrasound revealed that Baby H might be measuring behind, my doctor had me double down on healthy fats, cut back on exercise and increase meal frequency. Now we know it was just a wonky measurement due to breech positioning, but nothing like another dip on the emotional roller-coaster that comes with being a first-time mom! 

Normal-sized meals may be out the window, and lack of time and energy can make it tempting to grab whatever’s nearby (or cave in to cravings) so I’ve been relying heavily on snacking. Having the following 15 mini-meals in my arsenal have been key to putting my mind at ease — and keeping my blood sugar levels from dropping.

1. Protein Shakes. Convenient grab-and-go-option for a quick shot of protein and calcium; my go-to is banana, ice, protein powder, peanut butter and milk in my trusty immersion blender.

2. Cheese Sticks & Crackers. Protein, calcium and just the right amount of carbs when you’re craving something salty and starchy.

3. Fruit with Nut Butter. Think of your usual apples, bananas and pears as a blank canvas for all the great butter flavors and blends out there.

4. Guacamole. Avocados are a wonderful source of good fats, and they’re especially delicious as a zesty dip (for chips) or spread (for sandwiches).

5. Cereal & Milk. Although my current favorite is shredded wheat with fruit in the middle (fiber!), I’ve eaten my fair share of fortified kids’ cereals without guilt these past nine-plus months.

6. Yogurt, Granola & Berries. One of my very favorite breakfasts, this parfait delivers good protein, nutrients and fiber without being too filling.

7. Oatmeal & Mix-ins. Pick a theme — sweet or savory — and there’s no limit to the amount of good stuff that can be packed into one bowl!

8. Fresh Fruit. Delicious, portable, bursting with nutrients and full of flavor, I aim for a few servings a day to add variety to my diet.

9. Hard-Boiled Eggs. Incredible and edible, these protein-packed bites are a great way to stay satiated between meals and keep energy levels steady.

10. Dried Fruit & Nuts. Mix and match for a sweet and salty treat that’s great for taking with you for anywhere, anytime snacking.

11. Ants on a Log. Don’t discount the old childhood throwback! Spread your favorite peanut butter on celery sticks, and top with raisins.

12. Cottage Cheese & Sunflower Seeds. I know, I know…it’s a weird combo. But don’t knock it ’til you try it — the creamy, crunchy, savory flavors hit the spot.

13. Dates With Cream Cheese & Walnuts. Halve dates, fill with a smear of cream cheese and top with a walnut. Also makes an elegant appetizer!

14. Baby Carrots & Hummus. When you’ve got a craving for crunch, nothing does the trick quite like this sweet, tangy combination.

15. Healthy Bars. Make your own or pick up a few favorites (mine are KIND, LUNA and Larabar) to pack in your purse for when hanger strikes.

What are your favorite pregnancy (and non-pregnancy!) snacks? 

Recipe: Zest Nutrition’s Cookies in a Jar

IMG_1293

When the ladies of Zest Nutrition whipped these little wonders out at their holiday party in December, it was love at first bite. And worth sharing now, even post-holiday, because I believe so strongly in their credo that “we deserve to eat food that tastes amazing and makes us feel good all year long.”

Since they’re so easy to make, I’ve been sharing them with friends who become seem to become equally obsessed (you’ve been warned). The first few batches were by the book, but I’ve since experimented by trying coconut flour in place of almond flour, adding half an extra banana and a tablespoon of chia seeds, and replacing the regularly-sized chocolate chips with mini morsels.

The Zest ladies also suggest swapping out the dried cranberries, chocolate chips and coconut for any other ingredients you like. Go wild, and indulge without guilt!

Cookies in a Jar

(original recipe here)

Ingredients (in jar):

  • 3/4 cup rolled oats
  • 1/2 cup almond meal
  • 1/4 cup shredded coconut
  • 1/4 cup dried cranberries
  • 1/4 cup dark chocolate chips
  • 1/4 tsp salt

Ingredients (to add):

  • 2 ripe bananas

Directions:

  1. Heat the oven to 350F.
  2. Mash bananas with a fork, then mix in jar ingredients until combined.
  3. Form cookies on baking sheet and bake for 20 min.

The best part? Each batch is perfectly proportioned for storage in your standard mason jar.

Mix ahead and save for a rainy day when cravings hit, or get crafty and share something nourishing — yet delicious — with your friends and family.

IMG_1295

Ever thought a vegan, gluten-free cookie with no refined sugar could be so tasty? Me, neither!

Recipe: Zest Nutrition’s Sweet & Spicy Walnuts

IMG_1049

When your doctor suggests that you double down on healthy fats to help your baby pack on the pounds in its last few weeks in utero, you happily oblige. Especially when you know you’ve got friends with something delicious up their sleeves to help perk up plain old nuts.

Typically, candied nuts are coated in butter and refined white sugar. But Megan and Anna, the brilliant minds behind Zest Nutrition, created a recipe that uses egg white instead of butter and maple syrup and coconut sugar for natural sweetness.

These tasty tidbits are their creation, which totally hit when spot when you’re looking for a quick sweet-n-savory snack. In fact, they’re downright addictive. You’ve been warned!

Sweet & Spicy Walnuts

(via Zest Nutrition)

Ingredients:

  • 4 cups walnut halves
  • 2 egg whites
  • 1/4 cup maple syrup
  • 3 tablespoons coconut sugar
  • 4 teaspoons cinnamon
  • 2 teaspoons chili powder
  • 2 teaspoons salt

Directions:

  1. Preheat oven to 350F.
  2. Coat walnuts in egg white and maple syrup.
  3. Stir together remaining ingredients and toss with walnut mixture.
  4. Bake for 20 minutes, option to stir halfway through.
  5. Allow to cool completely before storing. Flavors enhance once nuts have cooled and the crunch has set in.
How do you incorporate healthy fats into your diet?

Recipe: Capalbo’s Cauliflower Mac and Cheese

IMG_0505

Whenever I’m stumped for new dinner ideas, I like to ask friends what they’ve been eating. This recipe came from Anabel, who served up a new twist on a classic to rave reviews during a girls’ night.

While it’s not the super-smooth-and-creamy-chemical-laced boxed stuff, it does have a lot of good nutrients (cauliflower’s a great source of vitamin C, vitamin K, folate, pantothenic acid and vitamin B6, for example). It also hits the spot when you’re in the mood for a decadent-tasting side dish; I like to pair it with protein, like chicken or salmon.

And although mac and cheese is something I usually reserve for special occasions, Anabel assured me that it “tastes very rich and indulgent without having any butter and very little cheese.” Sold. 

Capalbo’s Cauliflower Mac and Cheese

(Adapted from “The Athlete’s Palate” in the March 2011 issue of Runner’s World)

Ingredients: 

  • 2 1/2 cups chicken stock
  • 2 bay leaves
  • 1 cauliflower, cored & cut into large pieces
  • 8 oz. whole-wheat elbow macaroni (I used an entire 13 oz. box)
  • 1/2 cup grated cheese (I used sharp cheddar)
  • 2 tablespoons olive oil
  • 1 tablespoon Dijon mustard
  • 1/8 teaspoon nutmeg
  • Salt and black pepper
  • 1/4 cup grated Parmesan cheese (I eyeball this)
  • 1/2 cup whole-grain bread crumbs (same as above)

Directions: 

  1. Heat oven to 400. Microwave cauliflower in a steamer bag for five minutes or until tender.
  2. Meanwhile, in a saucepan, warm stock and bay leaves on medium-low heat for five minutes; turn off heat.
  3. Place cauliflower blender or food processor. Add macaroni pasta to the boiling water and cook for five minutes. Drain pasta, and rinse to cool. Put pasta in a greased, 9-13-inch baking dish.
  4. Process cauliflower with stock (bay leaves removed), cheese, oil, mustard, nutmeg, salt and pepper. Note: if using a blender be sure to leave open a crack for steam to escape.
  5. Pour sauce over pasta, toss and spread evenly in dish. Top with Parmesan and bread crumbs.
  6. Bake 20 minutes or until golden brown on top.
Healthy mac and cheese — yea or nay?